Tuesday, July 28, 2009

Reclaimed Angora Neck Warmer

HOW TO: Reclaimed Angora Neck Warmer

The San Francisco Bay Area is unseasonably cold during the summer months - instead basking in warmth during the Spring and Fall seasons. So, because of the chilly weather of late, I thought about a project I did a while ago that I love, but have yet to share.

I bought the most beautiful Angora wool turtle neck sweater last year at the thrift store and wouldn't you know it, the very first time I washed it (before I wore it) I shrunk it!?! I was so upset, even though I had only spent $7.00 on it. I have never been able to afford real Angora before and this sweater was so nice, so I was heart broken. But I was determined to not let it be a total waste. I decided it was perfect for turning into a cozy neck warmer!

I've made a few of these in the past, but they've always been knitted and crocheted, and always gifts for friends and loved ones.


I figured since it was Angora wool and I had effectively "felted" the material by washing it, so it wasn't going to un-wind if I cut it. So, here goes....

Super Easy, Up-cycled Angora Neck Warmer

Materials:
-old turtleneck sweater made of wool, already shrunk or pre-shrunk
-scissors
-crochet needle
-yarn
-needle and thread
- buttons

Time: Depending on how quickly you crochet and sew, this can be an hour long project.

1. If you have an old, unwearable wool sweater and it's not yet shrunken, wash it in the hottest water setting possible on your washing machine. Make sure to utilize the energy and water you're using running a hot wash cycle by throwing in some other things that would BENEFIT from the hot wash - effectively killing two birds with one stone.

2. Once the sweater is dry, very carefully cut the neck off of the sweater, keeping as close to the seam as possible. Then, cut the turtle neck in half, top to bottom, creating the "seam" you'll use for the opening of the neck warmer.

3. Chain stitch your yarn, checking regularly to make sure it is the length of the entire border of the turtleneck. Be sure to chain stitch some extra length for your button loops.
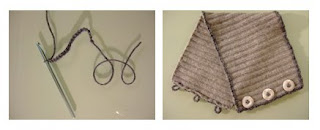


4. Use a large-eyed needle to sew the chain stitched yarn onto the entire outside border of the turtleneck, using the same yarn, which effectively "hides" these stitches. When you get to the front of the opening, where you'll eventually sew on buttons, sew loops into your border that will fit over your buttons.

5. Sew the buttons on to the opposite side of the opening that you stitched the loops on to. Make sure to line up the buttons to the loops so they are even when you are wearing your neck warmer.

6. You're done! Enjoy the coziness!


You didn't think I was going to waste the rest of the sweater did you? ;) Stay tuned, I'm either going to create a trim for that and turn it into a sweater for one of my toothpick-thin friends (hee hee) or I'll make it into the softest pillow ever adorned with crewl work, which I've always wanted to learn how to do.

Home Made, Recycled-Content Cat Toy

HOW TO: Recycled-Content Cat Toy
Anyone who knows me, knows that I am OBSESSED with my cats. I love them. I am 33 and don't have children yet, so all of my motherly-instinctive love goes to my two furballs, Shea and Kalyana-mitta.

While I don't like to throw things away, I am a huge proponent of giving things to Goodwill that are no longer useful in my house - one person's trash is another person's treasure (as the old adage goes). BUT, before I give anything away, I always keep it a bit and ponder what might be done with it, what useful thing could I make it into.... not all of these endeavors to turn "trash into treasure" are successful, but this project takes the cake for longevity and enjoyment!

Here's directions for making a Home Made Catnip Toy for your pussy!

Materials:
-used plastic bags
-umbrella cover or an old sock (you know, that one missing a mate, stolen by that wily Laundry Monster we all run into on occassion)
-copious amounts of catnip
-needle and thread
Time: Depending on how quickly you sew, this could take you anywhere from 5 to 15 minutes.

1. Take that weird umbrella sleeve-thingy you get with a new umbrella that you never use (!), or an old sock. If you're using the sock, cut the sock just above the ankle (where it curves as it leads into the foot area of the sock), essentially cutting the sock in half. You'll be using the leg portion of the sock, not the foot.

2. Cut the used plastic bags in half. I used about two plastic bags for the toy I made using the umbrella sleeve. I used one used plastic bag for an old sock.

3. If using a sock, sew up one end of the sock with the needle and thread. This isn't a beauty contest, so just sew it so that it's a tight, straight stitch and the catnip can't wiggle its way out.


4. Pour some cat nip into the umbrella sleeve or sewn-up-sock.

5. Krinkle the plastic bag and stuff it into the umbrella sleeve or sewn-up-sock.

6. Add more catnip, then plastic bag, and so on, until the sleeve or sock is stuffed full of both.

7. Sew up the open end of the sleeve or sock and, viola, you've got yourself a recycled-content, home made cat nip toy!

8. Tease your cat with it and watch them work themselves into a cat nip coma!

Enjoy!*


*These will eventually become covered in drool and dirt (if they play with them on the floor), so they will need to eventually be thrown out and you'll need to make a new one. The black-with-multi-colored-circles toy pictured above is about 4 years old. The cats still love it and because of the material (umbrella sleeve) it's far outlasted the old socks. But the socks hold their own as well, lasting at least a year or more.

Wednesday, July 22, 2009

It's been a long time and I won't go on about that.... except to say that I have been working really hard for the past two years for a non-profit in all of my spare time, plus another job. I've been too busy to really blog about all of the work that I've done on my crafting. As well as getting married to my partner of 11 years (this year in August) last year. But now I'm feeling some real space to record and talk about the work that I'm doing of late.

I'm a typical Gemini in that I get bored pretty quickly with just one style of crafting, so I'm usually into multiple projects at one time, including aromatherapy and embroidery, or embroidery and knitting, or embroidery and cooking(!), embroidery and stitching, etc. And as I play with each form of creative expression, I continually seek to change it up, to keep it interesting. So, I'm back in the game and I'm going to be updating the blog more to share my passion as expressed through crafts.

So to start us off... here's some mixed media projects I've completed recently. In particular, I was fascinated with the idea of embroidering on canvas, but realized the potential problems with that process, so I came up with an idea of embroidering on fabric, glue it to canvas and then disguising it somehow. The results....


This was a gift for friends for their wedding. It is a hand-drawn pattern embroidered on fabric, stretched canvas, oil paint, dried flowers and a deconstructed-wicker wreath.


This is my gift to my amazing mother. Again, a hand-drawn pattern embroidered on fabric, stretched canvas, acrylic paint, dried lavender and violets. I love my mom!