Sunday, November 8, 2009

Presenting the 2009 Solstice Crew

SHOW YOU: Meet the 2009 Solstice Crew!

I am moving back home this year, right smack dab in the middle of the winter holiday season, so I thought I'd get a jump on making some new additions to the Solstice Tree decorations.

Over the last couple of years, I have been making an effort to add some hand made decorations to the tree every year. And while posting this, I began to think of the very first Solstice Tree I ever put up in an apartment I lived in since being an adult living away from my mom... and remembered buying ornaments for a tree with my roommate, Jaime.


(Pic: Solstice Owl)

We were dirt poor, but both of us had a penchant for nostalgia and decided we'd find some ornaments and get a tree, that would dress up the basement apartment we lived in. We went to the dollar store and stocked up on Santa heads and glitter balls, etc. I still have the glitter balls and some of the Santa heads and they remind me of what it's like to be out on your own, trying to reconnect with those feelings of warmth, love and celebration that being with your family gives you, particularly during the holidays.

And what that then reminds me of is the kind of life I've led so far in my 33 years. During my childhood, we moved a lot because of my mom's job. I guess that sort of stuck when I struck out on my own, because I've lived in quite a few states and numerous apartments. And while the separation from those I love is really hard, particularly because they are now spread out across the country, I have come to realize that the greatest gift my mom has bestowed on me is the ability to find family wherever I am.


(Pic: Solstice Puss)

I have an expanded view of what it means to family. I don't think it really has much to do with biology, at its very core, although that's a very interesting part of what makes us related. But what I find more indicative of familial ties is the love that binds people together, no matter what race we are, what our backgrounds are, what our hobbies are - if we love each other that's enough to make us family. At least that's enough for me. (Pic: Solstice Birdie)

So this holiday season, while I am deeply saddened that I don't get to be around my biological family, I do get to be around other members of my family. I am going to sing the loudest, most heartfelt praises to the Goddess for blessing me with the most beautiful, amazing family one person could ever hope for. You know who you are! Blessed be! (Pic: Solstice Tortuga)


(Pic: Solstice Ristra)

Saturday, October 24, 2009

Crafting for the Climate!

Today is the International Day of Climate Action!

People in 181 countries are coming together for the most widespread day of environmental action in the planet's history. At over 5,200 events around the world, people gathered to call for strong action and bold leadership on the climate crisis.

For all those haters out there who claim that climate change is a hoax, a lie perpetrated by liberal radicals, I have a question for you - even if climate change isn't due entirely to human impact, what would it hurt to use less energy? To buy food and other goods locally to reduce our carbon footprint and rise in rates of asthma of communities that live near our transportation channels? To give some more thought to development projects that harm ecosystems and the biodiversity that makes life on this planet such that it is today? To continue to harness the innovative human spirit to develop cleaner, smarter technologies? What would any of that harm? Why are you so afraid of moving forward?

I'm personally working to increase awareness and reduce our impact on the planet, not because I believe in some naive notion of "simpler times," but because I believe that we can move forward in ways that will ensure that the absolute awesomeness of this planet is preserved. That we can do this while simultaneously evolving the way of life of all species in positive and profoundly meaningful ways. I am doing this for the children I will someday have. They need a safe place to live, and as their parent, I am going to work hard to ensure that's possible. I am doing this for the children of ally communities. I'm doing it because I care.

Check out 350.org for more information! Be active in your community, even if it's only in small ways. Every action has an impact. Make sure yours is positive and life affirming!

Saturday, October 17, 2009

Love Birds and Upcycled Sweater

SHOW YOU: Love Birds Thread Painting & Upcycled Angora Sweater

Love Birds for Sarah and Stan's wedding, 9/26/09

I've known Sarah and Stan for about four years now, befriending them when we all worked together at Rainforest Action Network. They weren't together when we all first met, but soon realized they were a match made in heaven, and now they're married! I thought I'd continue my exploration of thread painting on artist canvas. I found both of the elements separately (birds and branch), but used a light box to trace them onto the artist canvas (you can buy sheets of it in a notebook from the art store, super cheap!) with pencil. Reflecting back, I will probably use colored pencil to trace the next image I use because the pencil smudged really easily, although it was nice to be able to erase a line if I wanted to change it mid-embroidering. Something to think about...

After completing the embroidery, I custom-made the inside mat with some beautiful card stock I have, then added the red mat and framed it. I normally don't put glass over my work because I enjoy the depth and dimension not putting art behind glass adds. But artist canvas gets dirty so easily, I decided to use the glass to protect the surface for a longer period of time. I think it turned out very well!

Upcycled Angora Sweater for Weezie's Birthday, 10/8/09

I've known Weezie since we were in high school at Cibola in Albuquerque. I love her so very much and count her as one of my best friends. She is one of those rare friends, that love and encourages you to be exactly who are, no apologies. I appreciate and love her friendship and count it as one of the core blessings of my life.

So for her birthday this year, I decided to upcycle an amazing thrift store find, an angora sweater in a beautiful soft grey. I'd unintentionally felted (accidentally put it into the washer, without even thinking!?!) it on the first wash. Instead of throwing it away, I used the neck of the turtleneck for a neck warmer project I did about a year ago. Then, I decided to upcycle the sweater's main body. I used a blanket stitch to frame the sweater's opening and neck. This was an easy and quick project and I love it. Even though it shrunk during the accidental felting, Louisa has a small frame, so it fits her like a glove and it's still so incredibly soft - perfect!!!

I love crafting! Especially, for my friends. Simply put, it makes me so happy!!

Wednesday, October 14, 2009

Fall Blossoms

HOW TO: Wool Flower Pins

Wanna show-and-tell you about a quick and easy project I did last weekend, Wool Flower Pins.


All you need to do this super easy project is:

- beautiful buttons (I used some sorta pricey buttons I bought from Britex Fabrics in SF ages ago but never used; they are stained wood); it helps if the buttons have a shape reminiscent of petals, but not necessary.
- wool yarn
- crochet needle, size 5.50 for chunkier stitches
- felt
- needle and thread of similar color to your wool yarn
- glue gun
- pin

Here's how to make them:
1. Crochet a very simple and basic chain stitch, leaving about two inches of yarn at the beginning of your stitch; stitch about 8 inches; knot off and leave about two inches of yarn hanging off of the end.


2. Using your needle and thread, start to layer your crocheted stitch on top of itself and sew together; you can either go in a circle as I've done with one of the periwinkle flower pins, or you can do a more chaotic, random layering as I've done with the other two pictured above; make sure you end the layering by threading the end of the chain stitch down through the middle of the flower, so that you end up with the two extra ends hanging below your flower, next to one another (sort of like the stems of the flower).

3. Insert the two "stems" of the flower through the button holes and tie a firm knot, clip the ends of the yarn off so that you have two small pieces left.


4. Heat up your glue gun. In the meantime, cut a piece of felt that will cover the yarn knot on the back of the button, but not extend beyond the edge of the button. Additionally, cut out a small heart or other shape to glue over the pin backing; I do this so that it's prettier on the back of the pin and you don't have to see ugly glue poking through the holes on the pin.

5. Once the glue gun is ready, spread glue on the larger piece of felt and place over the knot, pressing firmly for a couple of seconds to ensure all corners are securely stuck to the button. Next, spread glue on the back of the pin, place on the felt tab, press firmly. Once the pin is secure, but before the glue cools, press the smaller, cover piece of felt on it and press firmly to secure.

6. Let your pin dry for about 12 hours to ensure that it's definitely secure. And enjoy!

Sunday, September 27, 2009

Thread Painting on Card Stock

SHOW YOU: Thread Painting on Card Stock

For a while now I have been interested in embroidering on things other than fabric, so I took a short adventure into the world of thread painting (aka embroidery) on paper. Turned out great, but I don't think overall I love this medium for my art. I prefer something with a little give, with some more texture and flexibility when it comes to mounting/displaying it. But here are a few things I created with card stock and embroidery thread, and other things....

I love this Father's Day card I made for my papi this year. The image is hand drawn by me and the binding for the card is a twig I found while walking through the lovely neighborhood I work in down near Berkeley's 4th Street area.


This second image is a card I made for my Grandma Dot (full image and close up). Her 86th birthday was this year and she is still spunky, beautiful and full of life! The image is also hand drawn by me.


Finally, this is a very special gift I made for one of my favorite redheads, Sarah O. I love her so much, we've been friends for so long and I thought I'd try something new as a birthday gift this year. The image is hand drawn by me, on card stock. The frame is stained and adorned with twigs from a deconstructed wreath I bought at the craft store a while ago. I also tried something new, by coloring in the some of the "white space" with colored pencils, which I thought added a little bit more substance to the image. I finished it with a hand carved message on the frame.


Even though the paper was fun and although I don't love using it, what I did enjoy through the experience of doing these three projects was the exploration of making something with so many different variables. I liked mixing up the elements, making it 3D and including natural elements. I've since moved on to embroidering on artist's canvas and it is my favorite medium by far. A little sneak peak of a project I'm working on right now...

Saturday, September 19, 2009

Bad Ass Babe!

SHOW YOU: Bad Ass Babe Thread Painting

This won't be a how-to post, but instead a quickie show-you post. I have been so busy, and involved with killing bird mites that got into our house about two months ago, so I've been unable to really craft the way I would like to. But I am finally again working on some great projects, which are of course presents for people, so I can't post updates on them until they are received.


This project was a quickie I made for my bestie, Jason. He's been doing drag for many years now and only ripens, gets sweeter and more glamorous with every passing year. He does drag as a form of art and he is magnificent at it. He is, hands down, one of the most beautiful drag queens I know of and I am so proud to support his creativity.

Anyway, Jason, aka Veronica Fake when in drag, had a really kick ass wig a long time ago that was dark hair with bangs and this image reminded me of that wig. And I LOVED when Veronica wore that hair, particularly because of her Hispanic background, the dark hair just frames her face and skin beautifully. So, when I purchased Sublime Stitching's Mitch O'Connell series, I knew I had to make something for Jason in honor of Veronica.

It started as an idea to make it into a little clutch Veronica could carry when she went out at night. But then time passed, two years in fact, and I finally realized I just needed to get it out of storage and finally gift Jason with it. So, this year for his birthday I finally framed the image. I love it!

Sunday, August 2, 2009

Easy Like Sunday Morning - One Hour Crocheted Necklace

HOW TO: Silky Soft Crochet Necklace

I love to crochet. I think it's way easier than knitting. Although I will say, I'm not a master at either, gaining just enough knowledge of both to do the basics, which I then use as additions to other projects. So, you see, I'm not a Sweater Knitter or anything that awesomely complex. I'm more a of a Scarf Knitter/Crocheter - row after simple row after simple row... I enjoy the less complicated, straight-forward act of knitting and crocheting, more as a practice of meditation and stress relief.


So, using the most basic skills necessary for crocheting, I created a necklace that took me about one hour (a little less 'cause I'm pretty fast at crocheting and sewing). Here's how...


One Hour Crocheted Necklace


Materials:

Super soft yarn
3.75 MM crochet needle
Scissors
Buttons
Large sewing needle (with a large eye)

Time:
1 hour or less

1. Chain stitch a single row, about 20 inches long (or however long you'd like your necklace). Make this number of stitches divisible by three (you'll see why at the end).

2. Begin chain stitching the second row, stitching only four stitches. This is going to be the little scallop on the necklace, so if you want them to be bigger, stitch a few more.

3. Count over three stitches on your first row and stitch the little loop into the third stitch. You made a little scalloped loop!


4. Stitch four more stitches, count three on the first row, stitch into the third one. Repeat until you reach the end of the necklace. Because you stitched your first row a number divisible by 3, you should reach the end with no excess stitches left over.

5. Tie off the ends. Now you should have a naked, scalloped necklace!

6. Next you're going to add the buttons. Thread your large-eyed needle with some of the yarn and sew on buttons wherever you would like embellishment. I love these beautiful abalone buttons!


7. It just so happens that I found this deep mauve-colored button in my button drawer that was a perfect match with the yarn and the perfect size to slip into the scallop loops. I secured this one to the end of the necklace. This button fits perfectly into the last scallop loop on the opposite end, serving as the necklace clasp.

You could use beads also, if you don't want to use buttons, anything you can secure to the necklace using needle and thread.

Enjoy!

Tuesday, July 28, 2009

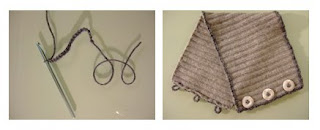
Reclaimed Angora Neck Warmer

HOW TO: Reclaimed Angora Neck Warmer

The San Francisco Bay Area is unseasonably cold during the summer months - instead basking in warmth during the Spring and Fall seasons. So, because of the chilly weather of late, I thought about a project I did a while ago that I love, but have yet to share.

I bought the most beautiful Angora wool turtle neck sweater last year at the thrift store and wouldn't you know it, the very first time I washed it (before I wore it) I shrunk it!?! I was so upset, even though I had only spent $7.00 on it. I have never been able to afford real Angora before and this sweater was so nice, so I was heart broken. But I was determined to not let it be a total waste. I decided it was perfect for turning into a cozy neck warmer!

I've made a few of these in the past, but they've always been knitted and crocheted, and always gifts for friends and loved ones.


I figured since it was Angora wool and I had effectively "felted" the material by washing it, so it wasn't going to un-wind if I cut it. So, here goes....

Super Easy, Up-cycled Angora Neck Warmer

Materials:
-old turtleneck sweater made of wool, already shrunk or pre-shrunk
-scissors
-crochet needle
-yarn
-needle and thread
- buttons

Time: Depending on how quickly you crochet and sew, this can be an hour long project.

1. If you have an old, unwearable wool sweater and it's not yet shrunken, wash it in the hottest water setting possible on your washing machine. Make sure to utilize the energy and water you're using running a hot wash cycle by throwing in some other things that would BENEFIT from the hot wash - effectively killing two birds with one stone.

2. Once the sweater is dry, very carefully cut the neck off of the sweater, keeping as close to the seam as possible. Then, cut the turtle neck in half, top to bottom, creating the "seam" you'll use for the opening of the neck warmer.

3. Chain stitch your yarn, checking regularly to make sure it is the length of the entire border of the turtleneck. Be sure to chain stitch some extra length for your button loops.


4. Use a large-eyed needle to sew the chain stitched yarn onto the entire outside border of the turtleneck, using the same yarn, which effectively "hides" these stitches. When you get to the front of the opening, where you'll eventually sew on buttons, sew loops into your border that will fit over your buttons.

5. Sew the buttons on to the opposite side of the opening that you stitched the loops on to. Make sure to line up the buttons to the loops so they are even when you are wearing your neck warmer.

6. You're done! Enjoy the coziness!


You didn't think I was going to waste the rest of the sweater did you? ;) Stay tuned, I'm either going to create a trim for that and turn it into a sweater for one of my toothpick-thin friends (hee hee) or I'll make it into the softest pillow ever adorned with crewl work, which I've always wanted to learn how to do.

Home Made, Recycled-Content Cat Toy

HOW TO: Recycled-Content Cat Toy
Anyone who knows me, knows that I am OBSESSED with my cats. I love them. I am 33 and don't have children yet, so all of my motherly-instinctive love goes to my two furballs, Shea and Kalyana-mitta.

While I don't like to throw things away, I am a huge proponent of giving things to Goodwill that are no longer useful in my house - one person's trash is another person's treasure (as the old adage goes). BUT, before I give anything away, I always keep it a bit and ponder what might be done with it, what useful thing could I make it into.... not all of these endeavors to turn "trash into treasure" are successful, but this project takes the cake for longevity and enjoyment!

Here's directions for making a Home Made Catnip Toy for your pussy!

Materials:
-used plastic bags
-umbrella cover or an old sock (you know, that one missing a mate, stolen by that wily Laundry Monster we all run into on occassion)
-copious amounts of catnip
-needle and thread
Time: Depending on how quickly you sew, this could take you anywhere from 5 to 15 minutes.

1. Take that weird umbrella sleeve-thingy you get with a new umbrella that you never use (!), or an old sock. If you're using the sock, cut the sock just above the ankle (where it curves as it leads into the foot area of the sock), essentially cutting the sock in half. You'll be using the leg portion of the sock, not the foot.

2. Cut the used plastic bags in half. I used about two plastic bags for the toy I made using the umbrella sleeve. I used one used plastic bag for an old sock.

3. If using a sock, sew up one end of the sock with the needle and thread. This isn't a beauty contest, so just sew it so that it's a tight, straight stitch and the catnip can't wiggle its way out.


4. Pour some cat nip into the umbrella sleeve or sewn-up-sock.

5. Krinkle the plastic bag and stuff it into the umbrella sleeve or sewn-up-sock.

6. Add more catnip, then plastic bag, and so on, until the sleeve or sock is stuffed full of both.

7. Sew up the open end of the sleeve or sock and, viola, you've got yourself a recycled-content, home made cat nip toy!

8. Tease your cat with it and watch them work themselves into a cat nip coma!

Enjoy!*


*These will eventually become covered in drool and dirt (if they play with them on the floor), so they will need to eventually be thrown out and you'll need to make a new one. The black-with-multi-colored-circles toy pictured above is about 4 years old. The cats still love it and because of the material (umbrella sleeve) it's far outlasted the old socks. But the socks hold their own as well, lasting at least a year or more.

Wednesday, July 22, 2009

It's been a long time and I won't go on about that.... except to say that I have been working really hard for the past two years for a non-profit in all of my spare time, plus another job. I've been too busy to really blog about all of the work that I've done on my crafting. As well as getting married to my partner of 11 years (this year in August) last year. But now I'm feeling some real space to record and talk about the work that I'm doing of late.

I'm a typical Gemini in that I get bored pretty quickly with just one style of crafting, so I'm usually into multiple projects at one time, including aromatherapy and embroidery, or embroidery and knitting, or embroidery and cooking(!), embroidery and stitching, etc. And as I play with each form of creative expression, I continually seek to change it up, to keep it interesting. So, I'm back in the game and I'm going to be updating the blog more to share my passion as expressed through crafts.

So to start us off... here's some mixed media projects I've completed recently. In particular, I was fascinated with the idea of embroidering on canvas, but realized the potential problems with that process, so I came up with an idea of embroidering on fabric, glue it to canvas and then disguising it somehow. The results....


This was a gift for friends for their wedding. It is a hand-drawn pattern embroidered on fabric, stretched canvas, oil paint, dried flowers and a deconstructed-wicker wreath.


This is my gift to my amazing mother. Again, a hand-drawn pattern embroidered on fabric, stretched canvas, acrylic paint, dried lavender and violets. I love my mom!